Fruit granola bars changed the way I snack.
I used to grab whatever was quick, usually something processed and packed with sugar. One day, I came across a recipe for chewy fruit granola bars that caught my eye. It seemed easy and wholesome, so I decided to give it a shot.
That first bite? Soft, fruity, and satisfying. I was hooked.

From that day, I started making my fruit-filled granola bars regularly. It felt good to know what I was eating and even better to share it with family. If you’re tired of overpriced, artificial snacks, it’s time to bring granola bars fruit into your kitchen.
You can also check out Homemade Protein Granola Bars, a powerful option for high-protein snacking.
Table of Contents
Why Choose Fruit Granola Bars?
My journey with fruit granola bars started on a busy Monday. I needed something quick, but I didn’t want another energy bar filled with things I couldn’t pronounce. So I made my own, and it was a game-changer.

The recipe was simple: oats, dates, dried berries, and a bit of nut butter. The result? Chewy fruit granola bars that were naturally sweet, soft, and kept me full until lunch.
It wasn’t long before they became my go-to snack. I started mixing it up some weeks, I’d use apricots and chia seeds, other times figs and cinnamon. With every batch, I loved the idea that these fruit-filled granola bars were fueling my body the right way.
People everywhere are craving cleaner options. Instead of highly processed snacks, more of us are choosing things like granola bars fruit blends, we can make at home in 15 minutes or less.
There’s also something comforting about knowing what’s in your food. When I prep a batch of fruit bars granola for the week, I feel like I’m investing in myself and my family. Even better, they’re easy to pack and perfect for school, work, or a post-workout bite.
Whether you’re keeping things simple or adding new ingredients, a homemade granola fruit bar gives you the flavor and energy you need, without any guesswork.
And if you’re in the mood for a cool dessert to pair with your bars, check out our Raw Vegan Matcha Cheesecake. It’s a healthy twist on indulgence.
Best Fruits to Use in Fruit Granola Bars
Dried vs. Fresh Fruit: What Works Best for Bars?
When I first started making my fruit granola bars, I was tempted to toss in fresh fruit for that juicy, soft texture. But after a few failed batches (read: soggy bars that didn’t hold together), I quickly learned that dried fruits are the way to go.
They’re naturally sweet, shelf-stable, and packed with nutrients without adding excess moisture. Unlike fresh fruit, which can shorten the life of your bars or make them fall apart, dried options keep your chewy fruit granola bars firm and flavorful.
That said, I do sometimes add mashed banana or apple sauce for moisture and sweetness but in small amounts and always combined with a good binder like oats or nut butter.
Top 7 Fruits for Flavor, Shelf Life, and Chewiness
Over time, I’ve found a few go-to ingredients that never disappoint. These dried fruits don’t just taste great; they hold up beautifully and give each granola fruit bar a rich, satisfying texture.
Here are my top picks:
| Fruit | Flavor Notes | Why I Love It |
|---|---|---|
| Dates | Sweet, caramel-like | Excellent binder and natural sugar source |
| Dried Cranberries | Tart & bright | Balances sweet ingredients well |
| Dried Apricots | Mild, honey-like | Adds a soft, chewy texture |
| Figs | Earthy and sweet | Adds fiber and crunch with seeds |
| Raisins | Classic & sweet | Budget-friendly and always available |
| Dried Blueberries | Tangy-sweet | Perfect in fruit bars granola with almonds |
| Dried Mango | Tropical, bright | Delicious in summer-inspired bars |
Mix and match these fruits based on season, mood, or what’s in your pantry. Some days I’ll do apricot-walnut bars, other days blueberry-almond or fig-hazelnut. That’s what I love about making my fruit-filled granola bars they’re endlessly customizable.
How to Prep Fruits for Granola Fruit Bar Success
One mistake I made early on was throwing in big chunks of dried fruit. Not only did they clump together, but they also made cutting the bars a mess. Now, I always chop my fruit into smaller, bite-sized pieces before mixing it in. It helps with even distribution and keeps your granola bars fruit firm and balanced.
Another trick I use? Soak tougher dried fruits like mango or apricots in warm water for 5 minutes before chopping. It softens them up and makes them easier to mix into the oat base without tearing the bar apart.
If you’re looking for something different but still homemade and healthy, discover great ideas like Watermelon Fries and Strawberry Dip, another snack that’s bright, fresh, and fun.
Easy Homemade Fruit Granola Bars Recipe
Ingredients You Need for Classic Fruit Bars Granola
Making your fruit granola bars doesn’t require fancy tools or rare ingredients. You probably already have most of what you need in your pantry.
Here’s my go-to base recipe for about 10 bars:
| Ingredient | Amount | Notes |
|---|---|---|
| Rolled oats | 2 cups | Use old-fashioned, not instant |
| Nut butter | ½ cup | Almond or peanut butter works great |
| Honey or maple syrup | ⅓ cup | Acts as a natural binder |
| Chopped dried fruit | ¾ cup | Optional, but adds warmth |
| Chia or flaxseeds | 2 tbsp | Optional, for added texture and fiber |
| Vanilla extract | 1 tsp | Optional but adds warmth |
| Pinch of salt | – | Balances the sweetness |
I often switch things up depending on what I have. Sometimes, I’ll use a mix of dates and cranberries; other times, I’ll go tropical with mango and coconut. That’s the beauty of fruit bars granola recipes: they’re flexible and fun.
Step-by-Step Guide for Chewy Fruit Granola Bars
After several batches (some successful, some…not so much), I’ve found this method gives the best results for chewy fruit granola bars that hold their shape and taste amazing.
1- Mix the dry ingredients
In a large bowl, combine oats, chopped dried fruits, seeds, and a pinch of salt.

2- Warm the wet ingredients
Gently heat the nut butter and honey (or maple syrup) in a saucepan until smooth. Stir in vanilla if using.

3- Combine and mix well
Pour the wet mix over the dry ingredients and stir until everything is fully coated.

4- Press into a pan
Line an 8×8-inch pan with parchment paper. Press the mixture in firmly and evenly I use the bottom of a glass to pack it tight.

5- Chill and set
Refrigerate for at least 1–2 hours. Once firm, cut into bars.


Store in the fridge for up to a week (though they rarely last that long in my house).
Pro Tips to Get the Right Texture and Binding
If your granola fruit bar crumbles, it’s likely because there’s not enough binder. Either add a touch more nut butter or press the mixture more firmly into the pan. And if your bars are too soft, a little more oat or chia seed usually helps.
Also, don’t skip the chilling step, it’s what transforms a sticky mix into proper bars. I once tried to rush it, and let’s just say I ended up with granola instead of granola bars fruit.
Looking for a bar that packs more protein? Check out our Homemade Protein Granola Bars, a fantastic base to build from if you’re fueling for workouts or long days.
Creative Fruit-Filled Granola Bar Variations
No-Bake, Gluten-Free, and Vegan Options
One of my favorite things about making fruit granola bars is how easy it is to customize them for different diets and preferences. When I first started experimenting, I wanted a version that didn’t need baking, mostly because I didn’t feel like turning on the oven. The result? A no-bake version that’s just as good, maybe even better.
To make chewy fruit granola bars without baking, I simply warm the wet ingredients (nut butter and maple syrup), mix them with oats and chopped dried fruit, then press them into a pan and chill until firm. No oven. No stress. And still packed with flavor.

For a vegan version, I always use maple syrup instead of honey. And for gluten-free friends, I make sure to buy certified gluten-free oats. Little changes like these make the bars accessible for everyone without sacrificing taste.
If you’re avoiding added sugar altogether, try using dates or mashed banana as your main binder. Not only do they hold everything together, but they give granola fruit bar recipes a rich, natural sweetness that’s incredibly satisfying.
High-Protein and Low-Sugar Fruit Bars Granola
Some days I need a snack that powers me through a workout or a long afternoon of work. That’s when I reach for a fruit bars granola recipe with a protein boost. I’ll add a scoop of protein powder, toss in some hemp seeds or chopped almonds, and use peanut butter for a denser texture.

Want it lower in sugar? Go easy on the dried fruit and use a mix of chopped nuts and seeds instead. I’ll sometimes make a batch with just a few raisins or cranberries and let the nutty flavor shine.
The trick is to balance just enough fruit for taste, paired with hearty ingredients that give the bar structure. This version has become a weekly staple in our home, and I always pack a few granola bars fruit when I know I won’t have time to sit down for a proper meal.
Kid-Friendly Combos Using Common Pantry Fruits
Let’s be real, getting kids to love healthy snacks isn’t always easy. But these bars? They disappear in my house.

My go-to mix for little ones: oats, sunflower seed butter, raisins, and a splash of vanilla. Simple, nut-free, and perfect for school lunches. Sometimes I’ll throw in a few mini chocolate chips or shredded coconut just to keep things fun.
Another favorite is a fruit-filled granola bar with dried apples, cinnamon, and a little maple syrup. It’s like apple pie in bar form without the sugar crash. And since they’re soft and easy to chew, they’re great for toddlers too.
If you want something totally outside the box, looking for inspiration? Try our Coconut Chocolate Bar Story, a great way to learn how sweet snacks can still be clean, fun, and delicious.
How to Store and Pack Granola Fruit Bars
When I first started making fruit granola bars, I wasn’t sure how long they’d stay fresh or how to keep them from drying out or getting too soft. After a few batches, I figured out what works.
For short-term use, I store chewy fruit granola bars in the fridge. They stay fresh for about a week in an airtight container. If I want to prep a larger batch, I wrap each granola fruit bar in parchment and freeze it. They last up to two months and thaw quickly.

When packing lunches, I’ll use silicone bags or snack boxes to keep my fruit-filled granola bars from getting squished. And for road trips? Hard containers work best. Granola bars fruit hold up well on the go, especially if you chill them first.
If you’re using moist ingredients like mashed banana or fresh fruit, I recommend refrigeration. It keeps the texture right and prevents spoilage.
And when you want something a little more refreshing, don’t miss our Watermelon Fries with Coconut Lime Dip, another snack that travels well and keeps cool.
Common Mistakes When Making Fruit Granola Bars
I’ve made a lot of batches of fruit granola bars, and trust me, some didn’t turn out right. The good news? Most issues are easy to fix once you know what to watch for.
Mistake 1: Bars That Fall Apart
Early on, I struggled with crumbling bars. I learned that if your mix is too dry or not packed tightly enough, it just won’t hold. The fix? Use enough binder, like nut butter or honey and always press the mixture down firmly. I now use the back of a measuring cup to pack my chewy fruit granola bars into the pan.
Mistake 2: Sticky, Too-Soft Texture
If your bars are sticky and fall apart when cut, chances are they need more oats or time to chill. Some dried fruits add extra moisture, which softens the bars. When I make fruit-filled granola bars with dates or figs, I always refrigerate them for at least 2 hours before slicing.
Mistake 3: Uneven Flavor or Texture
Big fruit chunks, dry bites, or clumped ingredients are all signs that the mix wasn’t balanced. I always chop my dried fruits into small pieces and stir everything really well to keep the texture even in every fruit bars granola bite.
One last tip: always taste the mix before pressing it into the pan. It’s the easiest way to adjust sweetness, texture, or spice.
And when I’m not in the mood for bars, I switch it up with treats like our Green Cheesecake Recipe smooth, no-bake dessert that always impresses.
FAQ’s Fruit Granola Bars
Are fruit granola bars healthy?
Yes, especially when homemade. Fruit granola bars made with whole oats, natural nut butter, and dried fruits offer fiber, protein, and slow-digesting carbs without the preservatives or added sugar you’ll find in many packaged versions.
What are the best fruits to use in granola bars?
I love using dried cherries, figs, apricots, or dates. They blend well and add chewiness without extra moisture. For chewy fruit granola bars, smaller chopped fruits work best so they mix evenly and don’t overpower the texture.
Why are my homemade granola bars too crumbly?
Usually, it’s a binder issue. Not enough nut butter or sweetener can cause this. When I make fruit-filled granola bars, I always press the mixture firmly into the pan and let it chill completely before slicing it makes a huge difference.
Can fruit granola bars help with weight loss?
Absolutely, as long as portion sizes and ingredients are in check. A balanced fruit bars granola recipe with oats, fruit, and protein can help curb cravings and keep you fuller longer, making it easier to manage calorie intake.
Are chewy fruit granola bars better than crunchy ones?
It depends on your taste! I prefer granola bars fruit recipes that are soft and chewy because they’re easier to bite into and don’t break apart. But if you’re after a crunch, toasting the oats before mixing can give a firmer texture.
How do I store homemade fruit-filled granola bars?
I store mine in the fridge for up to a week, or freeze them for up to 2 months. Wrapping each granola fruit bar individually in parchment makes it easy to grab and go without sticking together.
Conclusion
If there’s one thing I’ve learned from making my snacks, it’s that simple, honest ingredients make the best food, and fruit granola bars are proof of that.
Whether you want something quick for busy mornings, a post-workout snack, or just a healthier treat, making these at home gives you control, variety, and flavor. From classic combos to high-protein, vegan, or kid-friendly versions, there’s a bar for everyone.
If you’ve never tried making them, start with one small batch you might be surprised how easy it is. And once you do? You’ll never want to go back to the packaged kind again.
Want more snack ideas? Check out our Matcha Cheesecake Recipe or don’t miss our Raw Vegan Matcha Cheesecake for clean, crave-worthy desserts made with love.
👩🏻🍳 Recipe
Print
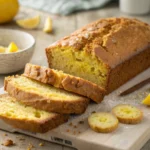
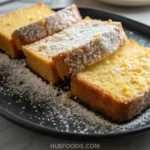
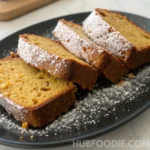
Fruit Granola Bars
- Prep Time: 15 minutes
- Cook Time: 0 minutes
- Total Time: 15 minutes
- Yield: 10 bars
- Category: Snack
- Method: No-Bake
- Cuisine: American
- Diet: Vegan
Description
These no-bake fruit granola bars are soft, chewy, and packed with dried fruits, oats, and natural nut butter. A healthy, customizable snack that’s perfect for meal prep, school lunches, or on-the-go energy.
Ingredients
- 2 cups rolled oats (old-fashioned)
- ½ cup nut butter (peanut or almond)
- ⅓ cup honey or maple syrup
- ¾ cup dried fruit (mix of dates, apricots, cranberries, etc.), chopped
- 2 tbsp chia or flaxseeds (optional)
- 1 tsp vanilla extract (optional)
- Pinch of salt
Instructions
- In a large mixing bowl, combine oats, chopped dried fruits, seeds, and salt.
- In a small saucepan, gently heat the nut butter and honey/maple syrup until smooth. Stir in vanilla.
- Pour the wet mixture over the dry ingredients and mix until fully coated.
- Line an 8×8-inch pan with parchment paper. Press the mixture into the pan firmly and evenly.
- Chill in the refrigerator for 1–2 hours, or until firm.
- Slice into bars and store in an airtight container.
Notes
For a vegan version, use maple syrup instead of honey.
Store bars in the fridge for up to 1 week or freeze for up to 2 months.
Add nuts, seeds, chocolate chips, or coconut flakes to customize.
Love what you see? Follow me on Facebook and Pinterest for more easy, delicious recipes and daily inspiration!